The final Thanksgiving blog. Why did I break the blog into pieces? I figured it would be considerably easier to read rather than in one novella sized post.
I've never made gravy before, and, strangely, it was the part of the meal I was most nervous about. People are always talking about lumpy or tasteless gravy...I love gravy and wanted it to be perfect (my Aunt Charlotte makes a spectacular gravy and I would love to be able to make a similar one).
I decided on the Quick Turkey Gravy (p. 547). There were a lot of drippings in the pan. Four cups of chicken stock were added to the stock and the drippings were s
The stock/pan drippings was then boiled down until it is the correct consistency.
A little bit of water and cornstarch are mixed together (my grandmother [who grew up in the Depression] used to make a mix JUST like this for me to use as glue when I was a child).
The cornstarch is then slowly whisked into the pan and it's simmered for about a minute. Then it's poured into the gravy boat...
How was it? Perfect! No lumps at all. It took mom quite a while to try to skim the fat off of the top but she did a great job. It was slightly salty, I imagine from the pan juices of the salt-brined turkey, but still really good. And it heated up perfectly (I ate it for the next week!).
I don't like stuffing the turkey, so I make the stuffing in a dish. This year, I chose Italian Bread Stuffing (p. 533). The first step is to cook some onion and garlic in butter for about five minutes. You add that to a bowl.
The breadcrumbs are added...
Then bread crumbs, (a LOT of) Parmesan, an egg, some parsley, rosemary, sage, salt, and pepper are added.
The stuffing is then moisened with some chicken stock and poured into a dish.
When I finished the first batch there was almost no stuffing! Honestly, there was about two cups of stuffing--not near enough for people who love stuffing! So I tripled the recipe. And the stuffing was attractive when it came out of the oven.
Apparently tripling the recipe was a mistake.
The stuffing was attractive. And it was salty. Strike that--it was SALTY. Almost inedibly salty. I figure that when tripling the recipe, the enormous amount of Parmesan cheese (a cup and a half) was WAY too much for the stuffing. This recipe is struck off of the list for future years although I would love to know if anyone else have made this recipe and had better luck...
The final table (mostly). It was extremely difficult to fit everything on the table! I also made TJOC's blue cheese dressing, which I've made before. It was still delicious and easy! So delicious, in fact, that mom refused to give it up and let us take it home :) As you can see in the picture, the salad came out of a bag.
I find this picture amazing because it's of my mom but if you didn't know that, you'd think it was me! I've never thought that my mother and I looked particularly similar but this picture would say otherwise. She's washing dishes...and there were a TON of dishes to wash.
Friday, November 28, 2008
Thanksgiving 2008.2-- Roast Brined Turkey (p. 443) and Mashed Winter Squash (p. 308) plus dogs in costume!
On to the most important part of the Thanksgiving meal...the turkey! I decided to make Roast Brined Turkey (p. 443).
First step, brining the turkey. This was a slight problem...Josh and I were driving in on Wednesday, after he got off of work. This meant we got in around 1 am Thanksgiving morning. Another problem--what the heck should we brine the turkey in? I figured that a Styrofoam cooler would be as good as anything else--I got it at the grocery store.
The cooler:
The turkey, during it's rinse. I giggled the whole time--I don't know what it is about naked poultry but it makes me laugh every time.
The turkey then got dunked into the cooler and covered with two gallons of water and four cups of kosher salt (that is a LOT of salt). We turned the turkey at the six hour mark so that both sides would get brined, since it wasn't entirely covered. This picture was taken when the turkey was finished.
After the turkey has brined for 12 hours, we took it out and rinsed it well. This was difficult--how do you know it's fully rinsed off?
An onion, carrot, and celery were then cut up to be shoved up the turkeys hole. When I pulled them out at the end, Josh was very impressed, like it was a clown car.
The turkey was set on the rack of the roasting pan (my roasting pan that I have to haul back and forth every Thanksgiving). I was glad I had a roasting pan because if you don't have one, TJOC recommends that you "prop it up with crumpled aluminum foil" and that sounds complex to me. We seasoned the breast-side first because it was supposed to start cooking breast-side down.
TJOC doesn't recommend seasoning, but that doesn't seem like a good idea. So mom seasoned it with all kinds of spices.
And then quite a bit of melted butter (this part actually is in TJOC) was smeared all over the turkey and it was popped into the oven. About two and a half hours in...you are supposed to flip the turkey.
"What?" you, the reader, exclaim.
You flip the turkey. TJOC says "wearing heat-resistant mitts or protecting your hand with paper towels, grasp the turkey at both ends and turn breast side up." PAPER TOWELS?? To pick up a boiling hot turkey?? I decided this was the perfect opportunity for Josh and his brother to get involved in TJOTJOC.
The turkey, pre-flip:
Getting ready to flip the turkey, and, yes, holding it with paper towels:
Why the paper towels? The turkey was greasy (remember the melted butter?). I protected the metal handles with dishclothes so they wouldn't burn themselves. And BAM!
The turkey, post-flip. I have to say, the flip does not make for a particularly beautiful turkey--it kinda looked to me like it had six-pack abs. I'm imagining it tells you to flip because the dark meat cooks slower than the white meat and the flipping allows for the dark meat to cook for a longer time.
Like an idiot, I managed to not get a picture of the finished project (I was in quite a bit of pain by the end of the cooking and was trying to get all of the final pieces figured out (mashed potatoes, heating up the mashed squash, the gravy). It fell through the cracks :(
Josh and his brother Jordan carving the turkey--and my mother's electric carving set getting it's once a year use:
The beautiful turkey, being carved:
Yum! The turkey was a bit salty but EXTREMELY juicy. It would be really difficult to overcook this turkey making it an excellent first turkey for me to have made...a starter turkey!
On to Mashed Winter Squash (p. 308). This was the BIGGEST PITA of the entire Thanksgiving meal.
The recipe doesn't look hard at all. Bake some winter squash and mash it with some butter, brown sugar, salt, ginger, cinnamon, and cream. Easy enough, right? Except for I baked the squash until it seemed done. Tried scooping it out--it wasn't done. Put it back in the oven. Tried again, same problem. Tried it again. Honestly, this squash took about four hours on a day where we had very little extra time. I have to make this recipe once more (Mashed Winter Squash II), unfortunately, but that will be the LAST time I ever make it. Was it good? Sure, but not good enough to be worth the trouble. The mashed potatoes were good, too, and took about a half an hour.
I was so angry with this recipe I could barely force myself to take the one picture I did.
And here are some adorable holiday pictures!
Santa Duchess! She has such an impressive beard!
And Marilyn Gracie...such a bombshell!
T-day '08.1-White Bean Dip with Rosemary & Garlic (p.73),Cheddar Cheese Ball (p.75), Uncooked Cranberry Relish (p.222)&Cooked Cranberry Relish (p.221)
Thanksgiving! This is my second TJOC Thanksgiving! Unfortunately, I felt TERRIBLE. The plan had been that I would do all the cooking on Thanksgiving, allowing me to knock off several more TJOC recipes--and I STUCK TO IT. Let me tell you, adreneline is powerful and all of my stress torpedoed be through the day (although I paid for it later)--I was able to cook Thanksgiving supper (I feel strongly that the meal should be eaten in the evening, not at three). This post is going to be broken into two blogs because there is just way too much to post about!
Like last year, our Thanksgiving was very small--just Josh, his brother, mom, and me. Even so--we made the whole feast.
To start off the holiday, I made a couple hors d'oeuvres for lunch. First up, White Bean Dip with Rosemary and Garlic (p. 73). Josh isn't a big bean fan but he is a HUGE garlic fan, so I hoped that would make up for it.
First step, cook minced rosemary (straight off of mom's rosemary bush--but rosemary does NOT like mincing), garlic, and pepper in some hot olive oil.
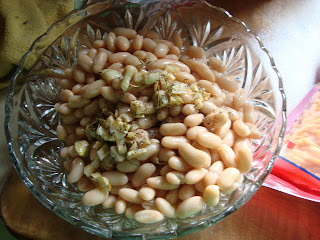
Watch it--this is a dangerous step. The olive oil popped right into my face! It was terrifying and it hurt. The white beans and the garlic mixture are stirred together.
Mash it down and there you have it--white bean dip!
It was delicious and garlicy. I think it would be perfect for a potluck or a dinner for vegetarians/vegans. The recipe is online (although you should buy your own copy of TJOC!).
Next up, a Cheddar Cheese Ball (p. 75)--deliciously retro! TJOC has 3 cheese ball recipes. I assumed there would be more in the older versions of TJOC--but my 1953 TJOC only has two recipes, so I'm obviously wrong. It also has a recipe for Mayonaise Puffs, which I may have to make as I'm seriously considering having a monthly "Retro TJOC" entry--any opinions? Would you like the addition?
First step...mix shredded cheese, a little cream cheese, some bacon (cooked of course!), a couple tablespoons of milk, a bit of horseradish, and some salt in the tiny food processor. This was NOT an easy task and at several times in the blending, smoke came from the processor (don't worry, it didn't break).
Place the mixture on a piece of wax paper:
Now wrap the cheese mixture into a cheese ball...
Unwrap the ball (in a perfect world, you would refrigerate this for a day, but we were low on time, so it didn't get chilled at all). Roll it in walnuts or pecans and there you have it! A perfect, beautiful cheese ball!
So how was it? Very tasty! I would go so far as to say exceptionally tasty. It was great on crackers and had a great smoky bacony flavor. Next time I would like to make it with smoked cheddar...that would make it even better I think. Again, perfect for a potluck.
Oddly, there were two cranberry sauces on the menu. Why two? Because I wanted to make a cooked cranberry sauce and mom likes the uncooked, so we made both. Mom mentioned that this must mean we've made all of the cranberry recipes in TJOC--we haven't even made half of them (there are five cranberry sauce recipes in TJOC).
The first cranberry recipe was Uncooked Cranberry Relish (p. 222). The first step was to chop the cranberries and the orange (half of both) in the food processor. Unfortunately, mom has the same tiny food processor that I do and this was not an easy task.
The orange looked delicious--and it didn't have any seeds, which was nice.
The processor was too small for the cranberries.
I think that the orange peel was supposed to get chopped up into the mixture. That did not happen. The orange rinds were chewed up but not chopped up. We decided to just throw them out.
And back to processing:
(It was nice to have mom as a model!) A cup of sugar is then added in and the cranberries sit for a day in the refrigerator. I don't have an after picture, you will just have to use your imagination.
The cranberries were good although not as good as my mom's normal uncooked cranberry relish. I don't imagine this recipe will be made again in the future.
The second cranberry recipe, for me, was the Cooked Cranberry Relish (p. 221). The recipe was easy--cranberries, sugar, water, and orange juice mixed in a skillet, and then simmered until the cranberries "pop" and the relish is "thickened".
I found the popping to be a little intimidating. It cooked down quite a bit and was really tasty--although really sour. If you like cooked cranberries this is a really good recipe. I think it would be even better with the (suggest) add-ins of a couple tablespoons of balsamic vinegar or port and some dried cherries. Maybe next year!
Like last year, our Thanksgiving was very small--just Josh, his brother, mom, and me. Even so--we made the whole feast.
To start off the holiday, I made a couple hors d'oeuvres for lunch. First up, White Bean Dip with Rosemary and Garlic (p. 73). Josh isn't a big bean fan but he is a HUGE garlic fan, so I hoped that would make up for it.
First step, cook minced rosemary (straight off of mom's rosemary bush--but rosemary does NOT like mincing), garlic, and pepper in some hot olive oil.
Watch it--this is a dangerous step. The olive oil popped right into my face! It was terrifying and it hurt. The white beans and the garlic mixture are stirred together.
Mash it down and there you have it--white bean dip!
It was delicious and garlicy. I think it would be perfect for a potluck or a dinner for vegetarians/vegans. The recipe is online (although you should buy your own copy of TJOC!).
Next up, a Cheddar Cheese Ball (p. 75)--deliciously retro! TJOC has 3 cheese ball recipes. I assumed there would be more in the older versions of TJOC--but my 1953 TJOC only has two recipes, so I'm obviously wrong. It also has a recipe for Mayonaise Puffs, which I may have to make as I'm seriously considering having a monthly "Retro TJOC" entry--any opinions? Would you like the addition?
First step...mix shredded cheese, a little cream cheese, some bacon (cooked of course!), a couple tablespoons of milk, a bit of horseradish, and some salt in the tiny food processor. This was NOT an easy task and at several times in the blending, smoke came from the processor (don't worry, it didn't break).
Place the mixture on a piece of wax paper:
Now wrap the cheese mixture into a cheese ball...
Unwrap the ball (in a perfect world, you would refrigerate this for a day, but we were low on time, so it didn't get chilled at all). Roll it in walnuts or pecans and there you have it! A perfect, beautiful cheese ball!
So how was it? Very tasty! I would go so far as to say exceptionally tasty. It was great on crackers and had a great smoky bacony flavor. Next time I would like to make it with smoked cheddar...that would make it even better I think. Again, perfect for a potluck.
Oddly, there were two cranberry sauces on the menu. Why two? Because I wanted to make a cooked cranberry sauce and mom likes the uncooked, so we made both. Mom mentioned that this must mean we've made all of the cranberry recipes in TJOC--we haven't even made half of them (there are five cranberry sauce recipes in TJOC).
The first cranberry recipe was Uncooked Cranberry Relish (p. 222). The first step was to chop the cranberries and the orange (half of both) in the food processor. Unfortunately, mom has the same tiny food processor that I do and this was not an easy task.
The orange looked delicious--and it didn't have any seeds, which was nice.
The processor was too small for the cranberries.
I think that the orange peel was supposed to get chopped up into the mixture. That did not happen. The orange rinds were chewed up but not chopped up. We decided to just throw them out.
And back to processing:
(It was nice to have mom as a model!) A cup of sugar is then added in and the cranberries sit for a day in the refrigerator. I don't have an after picture, you will just have to use your imagination.
The cranberries were good although not as good as my mom's normal uncooked cranberry relish. I don't imagine this recipe will be made again in the future.
The second cranberry recipe, for me, was the Cooked Cranberry Relish (p. 221). The recipe was easy--cranberries, sugar, water, and orange juice mixed in a skillet, and then simmered until the cranberries "pop" and the relish is "thickened".
I found the popping to be a little intimidating. It cooked down quite a bit and was really tasty--although really sour. If you like cooked cranberries this is a really good recipe. I think it would be even better with the (suggest) add-ins of a couple tablespoons of balsamic vinegar or port and some dried cherries. Maybe next year!
Labels:
appetizers and hors d'oeuvres,
fruits,
vegetables
Sunday, November 9, 2008
Tuna Salad (p. 164), Tuna melt (p. 182), Panned or Sicilian Spinach (p. 306), and Ginger soy sauce (p. 571)
This is the lost blog of November.
Many of you know that although I date these the day I actually cooked them, I often blog about them considerably later. While leafing through TJOC recently I noticed a couple recipes that I KNEW I made weren't marked and when I searched the blog, I noticed that they weren't blogged about. So I'm correcting the problem, about two months too late.
Most of my regular readers know that there aren't many foods that I extremely dislike. Onions are one, although I'm growing to hate them less and include them in most TJOC recipes. Bell peppers--always get cut from recipes. And my number one enemy:
This guy.
Tuna. Canned tuna is so disgusting that even the smell makes me nauseous.
Fortunately, Josh loves tuna. Honestly, we have a grocery stores worth of tuna in this house. And he happily eats all of the TJOC tuna recipes.
I made Tuna Salad (p. 164). I'm just not much of a meat salad type person (although I've developed a curried chicken salad that is amazing!).
The recipe is easy. Mix tuna, celery, and mayonnaise. And you are finished.
It's a pretty boring recipe but it is really easy. If you tuna lovers are anything like me, you have your favorite additions to the meat salad. This recipe is extremely bare-bones.
So what did I do with this boring tuna salad?
Made a tuna melt (p. 182)!
Once you have the tuna salad you are halfway to a tuna melt.
Take a few slices of toast, spread tuna salad on them, and top it with some grated Monterey Jack cheese.
And then broil:
I made the tuna melts in the toaster over. I really recommend using a toaster oven when you don't want heat up the house.
Josh said the tuna wraps were tasty, although he said I piled the tuna way too high. They must have been good because after he ate those two, he made himself another :) Even so, it's likely that's the last tuna melt I will ever be making.
I ate Panned or Sicilian Spinach (p. 306) instead of the tuna melts.
The first step was to trim and wash a pound of spinach. I always find this step to be annoying--I really hate washing vegetables.
In a skillet, I sauteed garlic (a lot of garlic--a LOT of garlic--far more than TJOC's recommendation) in olive oil.
The spinach was then added to the garlic. TJOC recommends cooking it for about 3-5 minutes but high altitude struck again and it took about twenty minutes.
The recipe recommends making a dipping sauce so I made Ginger soy sauce (p. 571).
This is an easy recipe. Start with ginger. I used my ginger from a tube (it looks gross but it IS real ginger).
Add a half-cup of soy sauce. That is a LOT of soy sauce.
How was it? Good but my mother makes a version of this that is much much better. Mom's recipe includes potatoes...and I thought the soy sauce was too soy saucey for spinach. I don't' think I would bother with the sauce again.
What was Josh doing while I was making tuna melts? Working on his beloved 1969 classic car with the dog. I told him that I would put their picture on the blog :) Who among my readers knows what kind of car this is?
Subscribe to:
Posts (Atom)